Infinite Lands Terrain
This is the main component required for Inifinite Lands to work properly. It incldues control for single chunk visualization and infinite generation, how to layout the diferent items, and configuration for the diverse processors.
You can use the button Sync & Regenerate to force a regeneration, in case of lost textures, wrong configuration or overall something is weird. This button will force a reset and restore. If the terrain is not updating when changes happen in the graph, make sure that Auto Update is enabled in the Graph Settings
Under that there’s the option to switch between Infinite Visualization or Single Visualization modes.
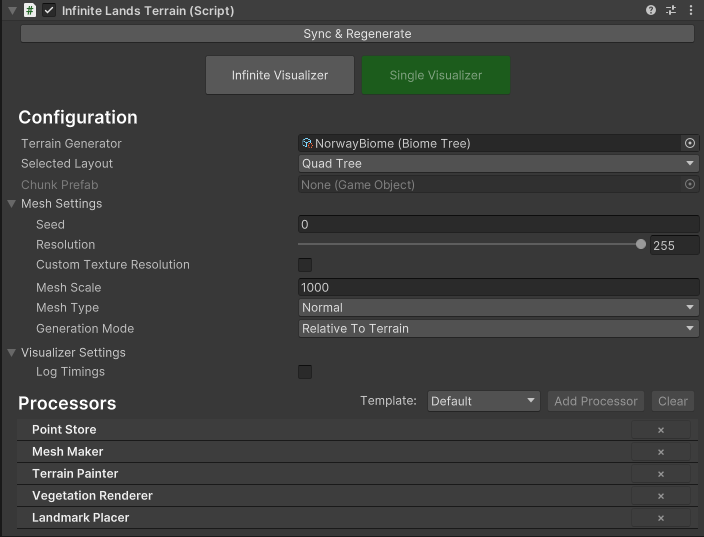
Settings
- Terrain Generator: What should it generate?
- Selected Layout: How should chunks be distribuited.
- Chunk Prefab: In case we follow a custom template, a custom chunk prefab can be set here.
- Mesh Settings: How is the mesh configured.
- View Settings: Configuration of available cameras and transforms.
- Generation Settings: Depend on the visualizer selected.
Single Visualizer Mode
On this mode only one chunk will be generated at a time. It is useful for quickly iterating over the terrain.
- Show Timings: Writes to the console the time that was needed to generate that chunk.

Dragging the terrain around allows to see a section of the world

Modifying the graph updates the visualizer in real time
Infinite Visualizer Mode
On this mode all chunks required to fill a distance of Generation Distance will be generated. It’s important to note the Selected Layout to configure how the chunks should be distribuited.
- Camera: Used to apply Frustrum Culling to the diferent chunks and the origin of generation.
- Generation Mode: The priority rules for the order of generation.

Close First

Far First
- Load In View FIrst: If enabled, the chunks that are in the view frustrum will be generated first.
- Generation Distance: Max distance to where chunks will be generated. With that setting and the small chunk settings mesh scale, it will calculate the number of quadtree levels to generate, the sizes of each and generate accordingly.
- Max Chunks Per Frame: How many chunks to generate in parallel.
- Ground Layer: Layer to apply to the generated chunks.
Layout
One of the most important settings to improve performance. It is recommended to always use Quad Tree.
- Quad Tree: Each chunk will be doulbe the size than a previous level, quickly filling the generation distance. Because of the size and how it scales from the player origin, the lower amount of detail shouldn’t be too big for the generated chunk.
- Simple Grid: Each chunk will have the same amount of detail and same size.

Quad Tree

Simple Grid
Processors
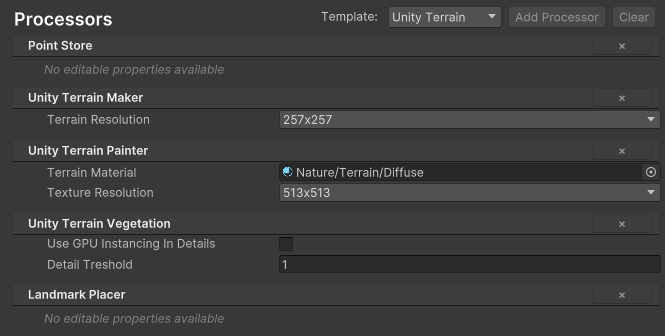
A processor is a sub-component that manages data created by the graph to perform certain sub actions. There are certain templates available:
Templates
Default Template
Unity Template
- Default Template: Prefered template to use when working with Infinite Lands. It will make use of a custom mesh rendering system, GPU instancing and a custom material to allow the maximum performance possible.
- Unity Terrain: Uses the default Unity Terrain with the corresponding necessary processors to pass down the data. It will provide slower terrain generation times.
- Cusotm: Gives control to what processors you would like to use.
Existing processors
By default, Infinite Lands includes some pre-written processors that you can use. Generally it is not required to create new ones. However, if working with custom data you might need to write a custom processor. You can create your own by going into Tutorials: Making a custom Processor.
World Data Store
The world data store keeps track of CoordinateDataHolders, which contain the height information at every single vertex of the generated chunks. It might be needed by other components, and has the next methods available:
- GetHolderAt(Vector3 position):Returns a CoordinateDataHolder object at a specific world position.
- GetHolderAtGrid(Vector2 position): Returns a CoordinateDataHolder object at a specific grid position.
- GetCoordinateDataAt(Vector3 position, out bool foundData, bool interpolated = false, bool inWorldSpace = true): Returns CoordinateData at a specific world position. You can define if the returned data is in world space or local space.
- GetCoordinateDataAtGrid(Vector2 position, out bool foundData, bool interpolated): Returns CoordinateData at a specific grid position.
To get a position in grid space we need to transform from world space to local space.
Vector3 flattened = infiniteLands.WorldToLocalPoint(position);
Vector2 gridPosition = new Vector2(flattened.x, flattened.z);
However, by calling the default implementations, that is not required.
Mesh Maker
The mesh maker processes the resulting chunk data and generates the desired mesh for the terrain.
- Decimated Mesh for Non Close LOD: Uses the Mesh Type of decimated mesh when the chunks are far away from the player. Can reduce polygon count and increase framerates for barely any visual difference.
- Decimated LOD: At which LOD value should it start making decimated meshes?

Normal procedure

Using decimated mesh
- Mesh Type: The type of mesh that will be generated
- Normal Mesh: This is a simple grid-like mesh.
- Decimated Mesh: It tries to simplify the mesh after creation to reduce the number of vertices while keeping the same look.

Normal Mesh

Decimated mesh
- Core Grid Spacing: Space between vertices to be used with decimated meshes. Generally the default option is correct, but can be increased to leave more space between triangles. It ensures that there’s always a vertex every Core Grid Spacing count.
-
Normal Reduce Threshold: Maximum normal difference between vertices to discard that triangle. If the normal difference is less than the defined threshold, the triangle will be discarded.
- Max Meshes per Frame: How many meshes can be processed at the same time in a single frame
- Max LOD with Colliders: Which lod value should start containing colliders? Value of 0 means that only the highest of detail lod value will contain a mesh collider while a value of 10 could potentially mean that all meshes will contain their mesh collider.
Terrain Painter
The Terrain painter will process assets of type IHoldTextures. Will apply the necessary texturing to the terrain, while providing the data to the vegetation system for a nice blend between the terrain and the vegetation.
- Use Maximum Texture Resolution: The final Width and Height of each texture used to paint the terrain will be the maximum available of all. Use this if you don’t want to lose quality at any texture.
- Width: Custom width used for the textures
- Height: Custom Height used for the textures
- Mip Count: Custom Mip Count used for the textures
- Terrain Material: Which material should be used to to the mesh?
Vegetation Renderer
The vegetation renderer will Process assets of type IHoldVegetation and render the necessary data on screen.
- Render in Layer: Which rendering layers should be used to render the vegetation? It will be used to know which cameras to fetch and therefore render the vegetation through them. The cameras referenced will be the ones defined in View Settings.
- Rendering Settings: Define optional custom maximum view distance settings. This will override the Maximum View Distance of vegetatin assets BY REDUCING THE VIEW DISTANCE if necessary.
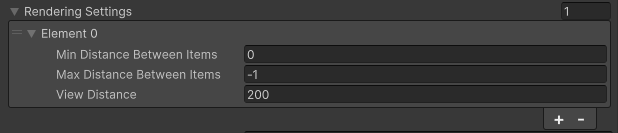
A render setting will be applied to those assets where it’s distance between items falls inside the range defined by Min Distance Between Items and Max Distance Between Items. If Max Distance Between Items is -1, the setting will be applied to all assets bigger than Min Distance Between Items. When applying the setting it will reduce the Asset view distance to the defined View Distance on the setting. This means that you cannot use this method to render longer distances.
A Render Setting can also be modified via code through AddNewRenderSettings and RemoveRenderSettings.
- Density Per Size: This value represents the maximum size of the chunk in relation to the density. 1000 means that it will allocate space for a chunk of size 1000x1000 when the density is 1, and use space of 500x500 when the density is 0.5;
- Render Vegetation: Should the vegetation be rendered?
-
Spawn Colliders Around Cameras: By default, the Vegetation System will only spawn colliders around the transforms set in View Settings. However, you can enable this flag to ensure that the camera positions are also taken into account when placing colliders.
- (BUILT-IN) Displace with movement: If enabled, a displacement texture will be created. This one can be sampled in a shader to make objects move according to outside factors. Via the use of a particle system with the specified material, the displacer will get the particles on the screen and pass them down to the shader.
- (BUILT-IN) Player Center: Transform that defines the center of displacement.
- (BUILT-IN) Cull Mask: The mask where the particles for the displacement texture are.
- (BUILT-IN) Displace Distance: How much distance from the player do you want to visualizer the displacement
- (BUILT-IN) Visualize On Display: Should it render the displacement to the screen? (For debugging purposes)
An example can be found with the grass shader, where, when moving around, the grass will receive the interaction and move with the player.
⚠️ I can’t make my vegetation work? I don’t see it?
The Vegetation Renderer requires that all asset materials make use of an Infinite Lands compatible shader. You can use the provided default shaders or head to the tutorial on how transform/make yours.
Landmark Placer
The Landmark placer will get the Prefabs and it’s points generated via Place Prefab Node and Instantiate them into the scene.
Unity Terrain Maker
Similar to Mesh Maker but for Unity Terrains.
- Terrain Resolution: Resolution of the Unity Terrain.
Unity Terrain Painter
Similar to Terrain Painter but for Unity Terrains.
- Texture Resolution: Resolution of the Unity textures.
Unity Terrain Vegetation
Similar to Vegetation Renderer but for Unity Terrains. It’s important to note that really low Distance Between items can create unexpected visual results. The included Vegetation shaders are not compatible with the default GPU Instancing requirement for unity terrain.
For that reason, on high density items (less than Detail Treshold), the materials should be swaped with a GPU Instancing and the boolean UseGPUInstancingInDetails should be enabled.
Other components
Floating Point Origin
Sometimes you will find that you try to move to in a big world and the vegetation starts to flicker. For that purpose, Infinite Lands comes with an implementtion of Floating Point Origin.
Floating Origin

Manages the dynamic world origin, resetting the origin when the reference object moves beyond a specified maximum distance. It triggers the OnOriginMove event, providing the new and previous origin values.
Floating Point

Synchronizes a GameObject with changes in a dynamic world origin managed by a FloatingOrigin component. It adjusts the object’s position when the origin shifts, with optional locking of movement along specific axes (LockX, LockY, LockZ). The OnOffsetAdded event is triggered whenever an offset is applied, allowing external systems to respond to position changes.
Floating Particle
Similar as FloatingPoint but for particle systems. Ensures that particles in a ParticleSystem remain correctly positioned relative to a dynamic world origin managed by a FloatingOrigin component. When the origin shifts, it adjusts particle positions by applying the calculated offset.
Environmental Components
These are other components that you can use on your project to assist certain functionalities. Those that contain the Infinite Lands Terrain parameter will be automatically grabbed if the object is inside the hierarchy (for example, spawned via the Landmark Placer or as a collider in the Vegetation Renderer). Otherwise, you will have to manually set it on the scene.
Align With Terrain

Adjusts a GameObject’s position and rotation to align smoothly with terrain or ground surfaces based on the selected alignment mode (None, Ground, Terrain). It integrates with a PointStore to track terrain changes and a FloatingPoint component for offset adjustments. The script ensures smooth transitions to target positions and updates rotation to match terrain normals or world space vectors.
Stay On Terrain

Ensures a GameObject remains above terrain at a specified vertical offset. It listens for terrain updates from a PointStore and adjusts the object’s position if it falls below a defined threshold relative to the ground after a mesh has been generated.
Show in LOD

Enables the defined Target Object once the terrain underneath is lower than the LOD Value.
Instance Data Holder
Component always added to all vegetation objects spawned in the terrain. This will be included with the colliders in GPU Instancing, or in the gameobject itself with CPU Instancing.
It provides data about the instance.
Apply Instance Textures To Particle
Applies the proper texture index to the material of a particle system within that gameobjet. Useful for spawning leafs or other particles that require the color of the vegetation asset itself.
Auto Organize Terrains
Allows to automatically place Unity Terrains that follow the Infinite Lands name structure. Shown in use in the Unity Terrain Tutorial
Sample Data
Allows the sampling of a specifically named Density Map inside the World Data Store, generated with [Density Map Output]/packages/infinite_lands/nodes/utility/special/densitymap.html
Shared
Mesh Settings

- Seed: The seed used to randomize the terrain
- Resolution: The mesh resolution by vertices.
- Custom Splat Map Resolution: Do you wish to have a diferent resolution for the textures?
- Texture Resolution: Define the resolution that the splat maps should be.
- Mesh Scale: The size of the mesh.
- Generation Mode: How should the default feature mode be. Relative to terrain or to the world
View Settings

View settings manages the Cameras and Transforms that will be used by subsequent components. For example, Vegetation Renderer uses the AllCameras list to know which cameras to render the vegetation, and the AllTransforms list to know where to spawn colliders.
- Force Stay Game Mode: When entering game mode, the scene cameras are not used neither for rendering or collision handling. This means that results might vary between Editor Mode and Play Mode. For faster generation and rendering in edit mode, or to ensure that what you see is what the player will see, you can enable this flag to force the scene cameras to be always ignored.
- Automatically Fetch Cameras: If enabled, when the game starts, it will automatically get all cameras in the scene that render to any active screen or texture.
-
Automatically Fetch Transforms: If enabled, when the game starts, it will automatically get all transforms that come from a Rigidbody or a Character Controller.
- Base Cameras: Manually set the cameras that you’d like to be taken into account.
- Base Transform: Manuallt set the transforms that you’d like to be taken into account.
You can use various methods to manually modify the used cameras and transforms:
- AddNewTransform(Transform body)
- RemoveTransform(Transform body)
- AddNewCamera(Camera cam)
- RemoveCamera(Camera cam)
- GetCurrentCameras() -> Returns a list with the current Cameras
- GetCurrentTransforms() -> Returns a list with the current Transforms